Disney Research Pioneers 3D Printing Technologies For Fabrics And Soft Objects
Many 3D printers in the consumer space create plastic objects by manipulating PLA or ABS filament. However, plastic isn't the only material these gadgets work with -- we've seen 3D printers use everything from delicious pancake batter to makeup materials. Well, go ahead and add fabric to the growing list of materials.
Researchers from Disney, Carnegie Mellon University, and Cornell University have come up with a new type of 3D printer that forms soft and squishy 3D objects using layers of fabric. Like any ordinary 3D printer, it starts with a design on a computer, like a bunny or even a cell phone case. Once you've come up with an object you'd like to print, the 3D printer gets to work.
The researchers describe the unique method of printing 3D fabric objects as "layered fabrication," as it builds objects from sheets of material. This is a method that already exists for paper and metal, but is relatively new to fabric, which presents certain challenges like snagging and bonding.
"Specifically, tool-based cutting (used in metal and paper printers) is likely to snag and deform fabric layers, and laser-based cutting -- while snag-free -- requires layers to be cut on a separate bed and moved to the print in progress, potentially requiring a complex printing system," the researchers explain.

Image Source: Disney Research
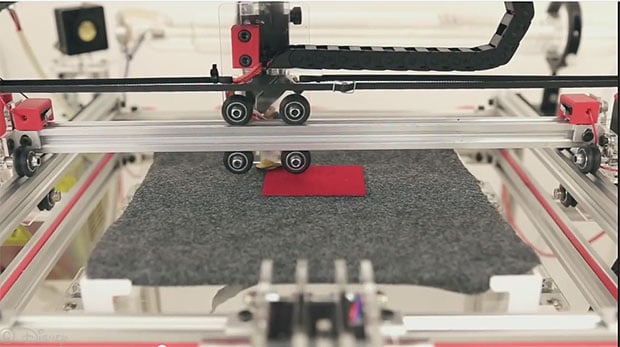
Disney and the gang solved the problem by using an inverted cutting bed fixed in place at the top of the printer. Fabric is fed to the bottom face of the bed by rollers mounted to the sides and and held in place by a vacuum during cutting.
Printed objects consists of sheets of fabric layered on top of each other. Each sheet forms a layer that's been cut along the a 2D contour from a laser beam generated from a water cooled 40W CO2 laser, the same as found in commercial laser cutters. When focusing the high-powered laser on a small spot, it vaporizes the material, leaving behind a clean cut.
In between cuts, layers are bonded to each other using a fusible adhesive called Heat-n-Bond. Heat and pressure are applied for 7 seconds for each layer.
The end result is an bendable object. However, using a series of cuts to internal layers that aren't visible in the final object, you can configure which way a particular objects bends. For example, if you're printing an angel's wing, internal cuts can dictate that the wing will bend horizontally, as if flapping in the wind, but not vertically, at least not with considerably more force.
This is a prototype device that was built as part of a research project, so it's not entirely clear where it goes from here. In the meantime, check out this lengthy PDF for even more geeky details.
Researchers from Disney, Carnegie Mellon University, and Cornell University have come up with a new type of 3D printer that forms soft and squishy 3D objects using layers of fabric. Like any ordinary 3D printer, it starts with a design on a computer, like a bunny or even a cell phone case. Once you've come up with an object you'd like to print, the 3D printer gets to work.
The researchers describe the unique method of printing 3D fabric objects as "layered fabrication," as it builds objects from sheets of material. This is a method that already exists for paper and metal, but is relatively new to fabric, which presents certain challenges like snagging and bonding.
"Specifically, tool-based cutting (used in metal and paper printers) is likely to snag and deform fabric layers, and laser-based cutting -- while snag-free -- requires layers to be cut on a separate bed and moved to the print in progress, potentially requiring a complex printing system," the researchers explain.

Image Source: Disney Research
Disney and the gang solved the problem by using an inverted cutting bed fixed in place at the top of the printer. Fabric is fed to the bottom face of the bed by rollers mounted to the sides and and held in place by a vacuum during cutting.
Printed objects consists of sheets of fabric layered on top of each other. Each sheet forms a layer that's been cut along the a 2D contour from a laser beam generated from a water cooled 40W CO2 laser, the same as found in commercial laser cutters. When focusing the high-powered laser on a small spot, it vaporizes the material, leaving behind a clean cut.
In between cuts, layers are bonded to each other using a fusible adhesive called Heat-n-Bond. Heat and pressure are applied for 7 seconds for each layer.
The end result is an bendable object. However, using a series of cuts to internal layers that aren't visible in the final object, you can configure which way a particular objects bends. For example, if you're printing an angel's wing, internal cuts can dictate that the wing will bend horizontally, as if flapping in the wind, but not vertically, at least not with considerably more force.
This is a prototype device that was built as part of a research project, so it's not entirely clear where it goes from here. In the meantime, check out this lengthy PDF for even more geeky details.