Build A Killer Amiga Emulator For Under $100 With The Raspberry Pi 3
Setting Up Amibian On Your Retro Amiga
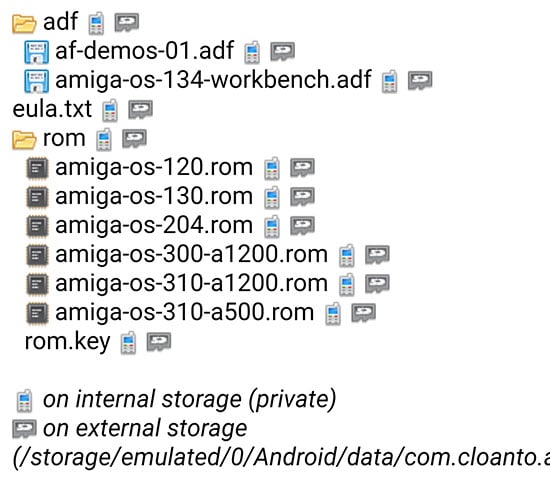
Once you’ve got all of the software downloaded, and have installed the SD Card Formatter and Win32 Disk Imager installed, the majority of the setup will be done on a PC. If you’ve downloaded Amiga ROMs online, keep those handy. We’re going to assume you went ahead and bought the $1.99 version of Amiga Forever from the Google Play store. If so, you’ll need to copy the ROMs and ADF files from your device first.
 The path to the files you’ll need should be:

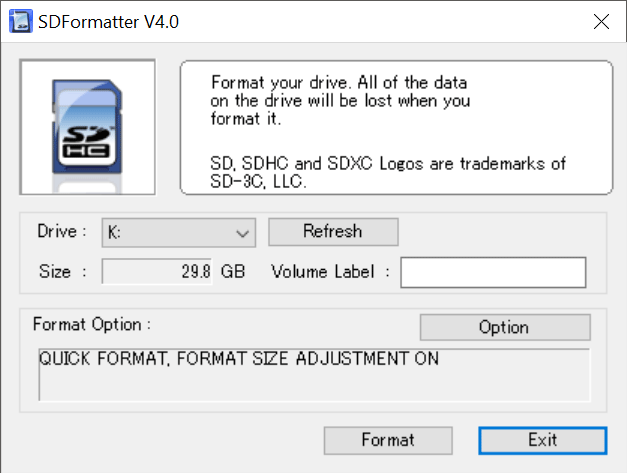
Next, insert the Micro-SD card into your card reader and launch the SD Card Formatter. Hit the Option button and flip on size adjustment and quick format, to ensure you free all of the available space on the card. This step may not be necessary with a brand new Micro-SD card, because the contents are going to get written over anyway, but if you’re using a spare card you’ve had lying around for a while, use the SD Card Formatter to ensure the card is clean and all of its capacity is being used.
To set the Micro-SD card up with Amibian, first extract the amibian1.4.img file from the archive that was downloaded and then run Win32Disk Imager. Click on the folder icon, navigate to the amibian14.img file and select it, and then ensure your Micro-SD card’s drive letter is selected in the Device drop down at the upper-right. Then click on the Write button and let the imager do its thing.
When writing Amibian to the card, the Win32Disk Imager will create two partitions, but only one will appear formatted to a Windows PC. If, after writing the Amibian image you’re prompted to format the second partition, hit cancel – do not format it. That’s where the Amiga-related files reside -- they just aren't readable on a PC.
Once Amibian is written to the card, it’s ready to boot for the first time in the Raspberry Pi 3. Connect your input devices to the Pi, insert the Micro SD card, attach a display, and then plug the Pi into its power adapter. The Amibian will boot and preset you with UAE4ARM configuration menu. This is the menu where you’ll configure the various Amiga settings and “insert” ADF files and attach ROMs, but there are a couple of additional steps necessary before we get to that, so exit UAE4ARM by clicking Quit at this point.
After exiting UAE4ARM, select option number 6 from the Amibian menu that appears, and on the resulting screen type “raspc” at the prompt and hit enter to open the Raspberry Pi Software Configuration Tool (raspi-config). When raspi-config opens, choose option 1 to expand the file system.
Doing so frees up all of the additional space on the Mico-SD card so it can be used by the file system. The process will only take a few seconds; when done select Finish, go back to the main menu and restart the Pi.
At this stage, we’re ready to copy ROMs and ADFs over to the Micro-SD card, which can be a bit cumbersome. Grab the USB drive with the ROMs and ADFs we mentioned earlier and attach it to the Pi. If you’re back inside UAE4ARM, exit that and get to the Amibian menu again. From there, select option 4 to run Midnight Commander. Midnight Commander is a basic file management program that works with the Amiga file system.
When Midnight Commander launches, you’ll see two panes. Files can be transferred to and from either pane, but for the sake of our discussion, consider the left pane the “source” and the right pane the “destination”. We’re going to copy the ROM and ADF files from the source (the USB drive) to the destination (folders on the Micro-SD card).
If the left pane, navigate up a couple of directories by selecting “/..” and hitting enter, until you see a /media folder. Select the media folder, and inside it, select the top most USB folder – that should be your USB drive. If you have multiple USB storage devices attached, just work your way through the list until you find the one with your ROMs and ADFs.
Now, navigate to the right pane (the tab button switches between panes) and select the Amiga directory. By default, Amibian creates a handful of directories inside there. We placed our ADF files inside the “Floppies” directory and ROMs inside the “Kickstarts” directory, but you can place them wherever you want. To actually copy the files over, open the desired destination directory, then tab back to the left pane and highlight the files you’d like to copy and hit the F5 key (the file options are listed at the bottom). When you’re done copying files over, exit Midnight Commander and restart your Pi...

- \Your Device\Phone\Android\data\com.cloanto.amigaforever.essentials\files\adf
- \Your Device\Phone\Android\data\com.cloanto.amigaforever.essentials\files\rom
Next, insert the Micro-SD card into your card reader and launch the SD Card Formatter. Hit the Option button and flip on size adjustment and quick format, to ensure you free all of the available space on the card. This step may not be necessary with a brand new Micro-SD card, because the contents are going to get written over anyway, but if you’re using a spare card you’ve had lying around for a while, use the SD Card Formatter to ensure the card is clean and all of its capacity is being used.

To set the Micro-SD card up with Amibian, first extract the amibian1.4.img file from the archive that was downloaded and then run Win32Disk Imager. Click on the folder icon, navigate to the amibian14.img file and select it, and then ensure your Micro-SD card’s drive letter is selected in the Device drop down at the upper-right. Then click on the Write button and let the imager do its thing.

When writing Amibian to the card, the Win32Disk Imager will create two partitions, but only one will appear formatted to a Windows PC. If, after writing the Amibian image you’re prompted to format the second partition, hit cancel – do not format it. That’s where the Amiga-related files reside -- they just aren't readable on a PC.

Once Amibian is written to the card, it’s ready to boot for the first time in the Raspberry Pi 3. Connect your input devices to the Pi, insert the Micro SD card, attach a display, and then plug the Pi into its power adapter. The Amibian will boot and preset you with UAE4ARM configuration menu. This is the menu where you’ll configure the various Amiga settings and “insert” ADF files and attach ROMs, but there are a couple of additional steps necessary before we get to that, so exit UAE4ARM by clicking Quit at this point.


Doing so frees up all of the additional space on the Mico-SD card so it can be used by the file system. The process will only take a few seconds; when done select Finish, go back to the main menu and restart the Pi.
At this stage, we’re ready to copy ROMs and ADFs over to the Micro-SD card, which can be a bit cumbersome. Grab the USB drive with the ROMs and ADFs we mentioned earlier and attach it to the Pi. If you’re back inside UAE4ARM, exit that and get to the Amibian menu again. From there, select option 4 to run Midnight Commander. Midnight Commander is a basic file management program that works with the Amiga file system.
When Midnight Commander launches, you’ll see two panes. Files can be transferred to and from either pane, but for the sake of our discussion, consider the left pane the “source” and the right pane the “destination”. We’re going to copy the ROM and ADF files from the source (the USB drive) to the destination (folders on the Micro-SD card).

If the left pane, navigate up a couple of directories by selecting “/..” and hitting enter, until you see a /media folder. Select the media folder, and inside it, select the top most USB folder – that should be your USB drive. If you have multiple USB storage devices attached, just work your way through the list until you find the one with your ROMs and ADFs.
Now, navigate to the right pane (the tab button switches between panes) and select the Amiga directory. By default, Amibian creates a handful of directories inside there. We placed our ADF files inside the “Floppies” directory and ROMs inside the “Kickstarts” directory, but you can place them wherever you want. To actually copy the files over, open the desired destination directory, then tab back to the left pane and highlight the files you’d like to copy and hit the F5 key (the file options are listed at the bottom). When you’re done copying files over, exit Midnight Commander and restart your Pi...


