Asus Striker II Formula nForce 780i Motherboard
Utilities and BIOS Options

We also took a look at some of the utilities on the disc that came with the ASUS Striker II Formula. Futuremark's 3DMark06 Advanced Edition and Kaspersky Anti-Virus are known entities, so we focused instead on the ASUS AI Suite. This application is more or less a fancy GUI that allows the user to optimize their system without getting their hands dirty in the BIOS.
The majority of the screen is taken up by a digital representation of the FSB and CPU speeds, with the current load listed underneath. Real-time temperatures and fan speeds are displayed above, but voltages seem to be limited to CPU Voltage. Serving as a starting point, the buttons on the lower left side launch separate utilities including AI Gear 3, AI Booster, AI Nap, CPU Level Up, and Q-Fan 2.
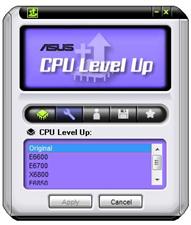
AI Booster takes the chore of overclocking and makes it a one-click wonder. You can choose percentages you want to overclock your system by, such as a tame 5% or a robust 20%. The downside is this effects the CPU speed only without being able to raise voltages or set memory dividers. Depending on the chosen hardware, it's possible that the settings will work without any further tweaking. CPU Level Up, which we will encounter later in the BIOS, is a more thorough overclocking application - as long as you have one of the CPUs listed in the picture. If so, CPU Level Up will provide a more comprehensive overclocking experience, tuning frequencies, voltages, and memory timings to work within that setup. AI Gear 3 works hand-in-hand with the EPU chip that automatically adjust processor frequency and core voltage for different computing needs. Using the Gearshift, the user can choose from Turbo, High Performance, Medium Power Saving, and Max power saving modes. These only come into play when not overclocking the system, however, as the application will not even launch when doing so. Not pictured are AI Nap and Q-Fan 2, which put the PC into sleep mode or control fan speeds for either better cooling or quieter operation.
Of course, one can access all of the same functions in the BIOS, which is fully featured. Using a variant of a Phoenix-Award BIOS, the main screen looks like almost any other allowing the user to set the system date and time, language, as well as give a quick readout on the drives, memory, and even the CPU installed (under system information). Befitting a board geared towards the PC enthusiast, the very next section is labeled "Extreme Tweaker" and it contains just about all of the options needed to get the most out of your hardware. It's also the first, but not last time, that we will come across the CPU Level Up choices. There are some non-extreme settings found here as well, including enabling or disabling voltage warning LEDs found on various spots on the motherboard or lighting up the ROG Logo.
Moving onward, AI NET2 checks for ethernet cable issues by testing one or both of the cables connected to the LAN jacks during the POST routine. Just about all onboard devices can be enabled or disabled including setting up SATA RAID, HD Audio, as well as the LAN and FireWire capabilities. This section also covers the LCD Poster, allowing the user to turn it on or off, provide a backlight, or choose their display. The default option is to show the current time, but this can be changed to show a short text string entered on the next line. This is probably where some of the latter items on the Extreme Tweaking page should have went, but it's not a huge issue.
Getting back to the Extreme Tweaker, this BIOS practically screams overclocking as the very first two options involve some kind of pre-set routines. CPU Level Up will optimize the board's voltages and memory dividers provided the CPU is one of a chosen few: E6600, E6700, X6800, or E6850. It will be interesting to see if newer CPUs are added in future BIOS revisions. Using the AI Overclock Tuner, a manual attempt can be initiated, or the user can choose from Auto, Standard, AI Overclock or, wait for it, CPU Level Up. Auto and Standard are just other terms or optimal or default settings, and don't necessarily fall under the OC guise. AI Overclock enables the same options found in the AI Booster, providing percentages to raise the CPU speed by, but without any other tweaking. Once you've chosen your desired overclocking options, you can save them under an O.C. Profile which can be restored at another time.
|
Selecting a manual overclock is where it all gets exciting, as this enables the manipulation of clock speeds, voltages, and other goodies to get that CPU cooking. Memory timings are actually located here as well, which might throw some people off if they don't associate the two. A quick check under Power will show you the current voltages and temperatures - a good section to keep an eye on to head off any potential issues when raising bus speeds. Over Voltage allows the boosting of the voltage for each component, including some values that should be considered dangerous to the lifespan of the hardware. Here are some of the ranges:
| CPU Voltage: CPU PLL Voltage: CPU VTT Voltage: Memory Voltage: NB Core Voltage: SB Core Voltage: 1.2v HT Voltage: Bridge Core Voltage: |
1.10V-2.40V (0.0625V steps) 1.50V-3.00V (0.02V steps) 1.20V-2.46V (0.02V steps) 1.50V-3.40V (0.02V steps) 1.20V-3.00V (0.02V steps) 1.50V-1.85V (0.05V steps) 1.20V-1.95V (0.05V steps) 1.20V-1.55V (0.05V steps) |
Choosing a voltage in the BIOS not only colors it green, yellow, or red in the BIOS, warning you of danger, but LEDs placed around the board will also light up as well. These LEDs can be separately configured to display any three of the voltages listed above.


