MSI P4N Diamond nForce4-SLI Motherboard
BIOS and Overclocking Results

|
There's plenty of room for tweaking in the AMI BIOS that MSI provides for the P4N Diamond. Whether it's basic functions like adjusting memory timings or more advanced overclocking tools, this board's BIOS has got it all. Starting with the Standard menus, we've got options used to configure anywhere from 1 to 8 drives on either the two IDE channels or the four SATA channels controlled by the SouthBridge. Even more impressive, once one enters the NVIDIA RAID setup feature from the Integrated Peripherals screen, hard drives installed to any of those eight channels can be used in the creation of that RAID array. Think an 8-drive JBOD and RAID 0 array spanning both IDE and SATA channels.
The rest of the on-board components are handled from the Integrated Peripherals screen, which allow the user to determine interrupt addresses for the various devices, or disable them entirely. These options include enabling or disabling the on-board Creative audio as well as the Silicon Image SATA RAID controller, which supports another two SATA hard drives. There's also a handy PC Health Status screen, which keeps user apprised of the Temperature, Fan Speed, and Voltages of the vital components.
The real jewel of the BIOS focuses on the Cell Menu, controlled by the Core Cell chip on the board itself. It's within here that the real power of the P4N Diamond can be unlocked, either manually or automatically. While we would normally stick with manually adjusting our rigs, CPU Dynamic Overclocking is a good way for some users to get some extra power from their system without having to worry about the details. MSI has a peculiar way of assigning their overclock levels, preferring to use military titles with associated percentages. Choosing 'Private' means a conservative 1% boost while going up the ranks to 'Commander' will increase clock speeds by 15%.
Manually setting the FSB and Memory clocks can provide greater speeds than the Dynamic Overclocking will allow for, but it requires a bit more insight and fine-tuning. As it is with all nForce-4 SLI boards, CPU and Memory clock speeds are adjusted independent of each other. Instead of dividers which force higher memory clock speeds in relation to the FSB chosen, one can raise the FSB solely, leaving the memory at stock speeds, if this was desirable. For our purposes, we will be raising both of them, but at the same time locking in the PCI-E Frequency, to minimize any instability that could occur with the graphic card. Raising speeds often requires raising the voltages, and this too is covered under the Voltage Control Function within the Cell Menu. Separate from the Cell Menu, however, is an additional option to overclock both the GPU and Memory of the video card itself, but only using MSI's built-in options.
|
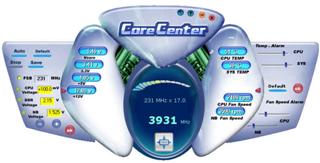
Even with all of the tools available to us within the BIOS, we wanted to take a crack at some of the utilities that come with the P4N Diamond, and specifically test the CoreCenter application. CoreCenter is a GUI implementation that gives Windows users a quick look at many BIOS related functions, all at once. Temperatures, fan speeds, and voltages are displayed on the main part of the screen and are updated dynamically. Click on the arrows on either side to provide advanced functions including raising the FSB speed, boosting the CPU, DDR, or NorthBridge voltages, or setting alarm thresholds. Not shown above, an additional SLI Mode button appears when two GeForce cards are installed, which can even allow the user to move in or out of SLI Mode at the click of a button. We clicked on the 'Auto' button to get a feel for how well the P4N Diamond would take to overclocking. Unfortunately, while the FSB pushed up to some nice speeds, it caused the system to crash without us being able to verify the top speed reachable.
 |
 |
| SANDRA CPU Results Overclocked to 4.04GHz |
CPU-Z Details with CPU Overclocked to 4.04GHz |
Back to ol' faithful, or the BIOS in this case, we began to duplicate the CoreCenter's efforts by raising the FSB 5MHz at a time. Once we reached 230MHz, we found that we needed to boost the CPU Voltage an extra 0.75V to keep the system stable. We also gave the memory an extra 0.5V, but didn't want to push too much here since the Corsair XM2 sticks we were using were already set at 2.1V. At this point it was largely hit or miss with overclocking, and we noticed some higher temperatures than expected on the CPU. We took a look at our setup, took it apart, and made sure that the connection between the CPU and heatsink was tight, with some Arctic Silver 5 used as the TIM. After reassembly, the system topped out at 237MHz for the FSB, and about 4.04GHz for the CPU. This is just about the highest we've reached with this CPU, and the gains are obvious: SANDRA scores jumped up about 20% over their original values.


