Nintendo Switch Review: Buying Advice And Tips For Maximum Fun
Nintendo Switch: Joy-Con Controllers
As with any game console, the controllers are as important as the graphics and actual game play. This is a high point for the Switch, except for the wrist strap, which could use a redesign. More on that in a moment.
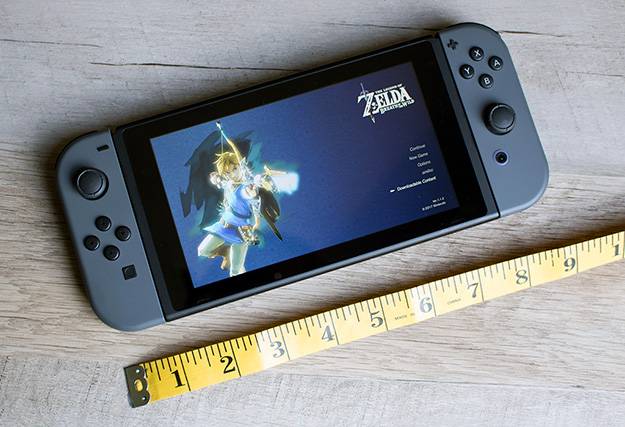
The control scheme for the Switch is pretty clever. It comes with left and right Joy-Con controllers, each with its own analog stick and top trigger buttons. There is a directional pad on the left Joy-Con, along with a handy screen capture button and a minus button (a select key, basically). And on the right Joy-Con there are the familiar X, Y, A, and B buttons, along with a Home button and a plus key (start menu). They're incredibly lightweight, yet don't feel chintzy.
In certain games these can be flipped horizontally and used individually, so up to two people can play with the included gear. They also come with their own wrist straps, though quite frankly the design here stinks.

There are a couple of problems. The first is that the wrist straps are specific to the left and right Joy-Con controllers, though it is incredibly easy to put the left wrist strap on the right Joy-Con and vice versa. How you can tell which is the left and which is the right is by the plus and minus symbols on the wrist strap. However, they're the same color as the rest of the wrist strap and are easy to miss, especially when you're overwhelmed with excitement at having actually scored a Switch.
What happens when you put a wrist strap on the wrong controller is that it slides too far and clicks into place. At that point, you're royally screwed, or so it seems. Some people have reported success with forcefully sliding it back down, but you'll need to tap into your inner Hulk to do that, and you risk breaking it. So what's the solution?
Well, you can get in touch with Nintendo and try out its customer support. Or you can do what I did, which is undo my mistake with a paperclip. First you need to straighten it out. Once you do that, peer into the space at the top of the Joy-Con where the wrist strap accessory overshoots it. You'll see two black clips inside. Push those in, make sure the wrist strap is unlocked, and slide it back off. Now pat yourself on the back and never make that mistake again.
The design is reminiscent of Samsung's original Note 5 with S Pen. If you inserted the S Pen backwards, which the Note 5 would happily accept, it would get stuck and no longer work correctly after you pulled it out. Samsung later revised the design so that you (or your kids) wouldn't be able to put the S Pen in backwards to begin with, and Nintendo really needs to the same with the wrist straps.
When installed correctly, the wrist straps will line up perfectly with the Joy-Con controllers. There is a tab on the bottom of each one to lock them in place, though I found they're not really needed. It takes a fair amount of force to remove the wrist straps—an annoying amount, actually, which is the second problem with this design. I imagine that parents of small children will be the ones taking them off when requested. This is a bit of a nitpick on my part, but considering the different ways you can use the Switch, removing the wrist strap should be super easy. In reality, it's easier to load a magazine into a pistol and remove it than it is to slide the wrist strap off a Joy-Con controller. Think about that for a moment.
For gaming on the big screen, you can hold the Joy-Con controllers in each hand, or attach them to the included Joy-Con grip. This is not the same as the separately sold Charging Grip ($29.99)—it is not powered and therefore can't charge the Joy-Con controllers. It's really just a plastic shell.
While not overly fancy, the Joy-Con grip does a good job of transforming the separate controllers into a more standard game pad, one that is lightweight and somewhat similar in feel to the Xbox One controller. I found it comfortable to use and preferred it to holding the Joy-Con controllers individually in each hand.
As for the Switch itself, Nintendo rates the battery life at 2.5 to 6 hours, and about 3 three hours when playing a game like Zelda. That 3-hour mark is about what I got out of it during game play.

The control scheme for the Switch is pretty clever. It comes with left and right Joy-Con controllers, each with its own analog stick and top trigger buttons. There is a directional pad on the left Joy-Con, along with a handy screen capture button and a minus button (a select key, basically). And on the right Joy-Con there are the familiar X, Y, A, and B buttons, along with a Home button and a plus key (start menu). They're incredibly lightweight, yet don't feel chintzy.
In certain games these can be flipped horizontally and used individually, so up to two people can play with the included gear. They also come with their own wrist straps, though quite frankly the design here stinks.

There are a couple of problems. The first is that the wrist straps are specific to the left and right Joy-Con controllers, though it is incredibly easy to put the left wrist strap on the right Joy-Con and vice versa. How you can tell which is the left and which is the right is by the plus and minus symbols on the wrist strap. However, they're the same color as the rest of the wrist strap and are easy to miss, especially when you're overwhelmed with excitement at having actually scored a Switch.
What happens when you put a wrist strap on the wrong controller is that it slides too far and clicks into place. At that point, you're royally screwed, or so it seems. Some people have reported success with forcefully sliding it back down, but you'll need to tap into your inner Hulk to do that, and you risk breaking it. So what's the solution?
Well, you can get in touch with Nintendo and try out its customer support. Or you can do what I did, which is undo my mistake with a paperclip. First you need to straighten it out. Once you do that, peer into the space at the top of the Joy-Con where the wrist strap accessory overshoots it. You'll see two black clips inside. Push those in, make sure the wrist strap is unlocked, and slide it back off. Now pat yourself on the back and never make that mistake again.
The design is reminiscent of Samsung's original Note 5 with S Pen. If you inserted the S Pen backwards, which the Note 5 would happily accept, it would get stuck and no longer work correctly after you pulled it out. Samsung later revised the design so that you (or your kids) wouldn't be able to put the S Pen in backwards to begin with, and Nintendo really needs to the same with the wrist straps.

When installed correctly, the wrist straps will line up perfectly with the Joy-Con controllers. There is a tab on the bottom of each one to lock them in place, though I found they're not really needed. It takes a fair amount of force to remove the wrist straps—an annoying amount, actually, which is the second problem with this design. I imagine that parents of small children will be the ones taking them off when requested. This is a bit of a nitpick on my part, but considering the different ways you can use the Switch, removing the wrist strap should be super easy. In reality, it's easier to load a magazine into a pistol and remove it than it is to slide the wrist strap off a Joy-Con controller. Think about that for a moment.


For gaming on the big screen, you can hold the Joy-Con controllers in each hand, or attach them to the included Joy-Con grip. This is not the same as the separately sold Charging Grip ($29.99)—it is not powered and therefore can't charge the Joy-Con controllers. It's really just a plastic shell.

While not overly fancy, the Joy-Con grip does a good job of transforming the separate controllers into a more standard game pad, one that is lightweight and somewhat similar in feel to the Xbox One controller. I found it comfortable to use and preferred it to holding the Joy-Con controllers individually in each hand.
Battery Life
Each Joy-Con controller has a non-removable 525 mAh battery inside. Nintendo says you can game on the controllers for up to 20 hours before needing to charge them. They never ran low while I was testing the Switch, though I can't say that I logged a full 20 hours in between the times I charged them with the console.As for the Switch itself, Nintendo rates the battery life at 2.5 to 6 hours, and about 3 three hours when playing a game like Zelda. That 3-hour mark is about what I got out of it during game play.


