|

 |
|
Setup & Quality of the
Shuttle SS40G XPC Mini
Barebones System |
|
Tight
quarters |
|
Compared
to the original SV24, the SS40G brings an entirely new
look with its clear Plexiglass face and aluminum
construction.
At the core of the SS40G is the Shuttle FS40 Flex ATX
motherboard. Equipped with a SiS740 North Bridge
and
SiS961 South Bridge, the mini barebones system
brings a slew of onboard features to the table.
With its fully integrated design, the FS40 offers the
most bang for the buck in a small footprint. The
front of the case sports a SPDIF, Earphone and
Microphone jacks for access to the onboard audio
features. Two USB 1 and one FireWire ports
are also located at the front of the system as well as
a Power switch, Reset button, HDD and power
LEDs.
When we
turn the system around, we find a plethora of various
connections on the rear of the unit. There are
two additional USB and FireWire ports available along
with an onboard Ethernet connector. The unit has
two serial ports, a single VGA and RCA connection for
video and TV-Out, and two P/S2 ports for a keyboard and
mouse. Three audio outputs are also provided to take
advantage of the 6-channel audio, driven by the CMI 8738
audio processor.
Once we removed the
cover to the unit, things got really interesting.
One of the major complaints about earlier mini
barebones models was that the chassis fan was too
loud. Thankfully, Shuttle heard this complaint
and took it seriously, coming up with an effective
solution. The end result was a one piece
copper-core heat-pipe assembly that cools the
processor and case with a single, quieter chassis
fan. This is by far the most innovative feature
we've seen to date with the XPC product line and it
appears to do its job effectively.
The
CD-ROM, Floppy and Hard Drive are all housed in a
single chassis that is easily removed with two screws.
Once we had the processor mounted and the heat-pipe
assembly in place, we installed our memory, and
secured the drive chassis into position. Within
a few minutes, we had all of the cabling easily routed
and we were up and running in no time at all. As
with the original SV24, we loved the look of the face
of the unit; however, once we installed our beige
drives, the "wow" effect was greatly diminished.
Fortunately, with a little creativity, we were able to
maintain the appearance, proving a little silver spray
paint can go a long way.
Thankfully, Shuttle included and excellent step by
step guide that displays a picture for every step of
the assembly process. We must warn you, though,
the written instructions are in multiple languages and
it appears that the English instructions have been
translated. This doesn't make the process any
harder, but some of the written instructions are tough
to understand.
|
|
|
The Hot Hardware Test Systems |
|
Spunky! |
|
HARDWARE:
Shuttle SS40G Barebones System
VisionTek Xstasy GeForce4 MX420
Athlon "Thunderbird" 1.2GHz. (1200MHz.)
256MB Crucial PC2100 DDR RAM
Maxtor 20GB UDMA/100 5400 RPM Hard Drive
Pioneer DVD 115 16X ATAPI DVD-ROM Drive
Standard 3.5" Floppy
On-Board NIC
On-Board Sound
SOFTWARE:
Microsoft Windows XP Professional
(With all current
Critical Updates)
SiS Video Drivers
(v2.07) - From SiS Website
SiS AGP Drivers (v1.10) - From SiS Website
All other drivers
installed from included CD.
|
Setting
Up:
The first thing we did was enter the
system BIOS and set the board to its "Optimized
Default" settings and the Memory CAS Latency
was set to 2T.
The hard drive was then formatted, and Windows XP
Professional was installed. We went to
Windows Update site and downloaded all of the
available updates, with the exception of Windows
Messenger. Then we installed all of the necessary
drivers, removed Windows Messenger, disabled
Auto-Updating, disabled System Restore and set a 768MB
permanent swap file. Lastly, we set the Visual Effects
to "best performance", installed all of the
benchmarking software and defragged the hard drive.
The
Testing:
The beauty of the SS40G is that it is perfect for a
second system. Although the system supports the
latest AthlonXP processors, we felt there were a good
number of users who would plan on using it with an
older T'bird they had lying around from when they
upgraded to a new XP processor. Since the SS40G
isn't geared toward the high-performance market, we
thought we would drop our 1.2GHz. T'bird into the
socket and let the benchmarks ride. To
demonstrate the various effects adding a PCI graphics
card would have on the system, we ran a number of the
scores with both graphics options to show where the
system benefited most.
|
|
|
|
Performance With SiSoft Sandra 2002 |
|
I Have a Sister
Named Sandra! Coincidence? Perhaps! |
|
SiSoftware's SANDRA (the System ANalyzer,
Diagnostic and Reporting Assistant)
is a very popular benchmarking, information and
diagnostic utility. We ran the four most common
tests with both graphics options to show what the
effects of adding a video card to the system has.
Since virtually every feature of the system is
integrated, alleviating the load by adding something
as simple as a PCI video card should show some
positive effects. Some tests will show no change
while others experienced a marked improvement.
CPU @ 1.2GHz. w/AGP
CPU @ 1.2GHz. w/PCI
Multimedia
@ 1.2GHz. w/AGP Multimedia @ 1.2GHz.
w/PCI
With both
the CPU and Multimedia tests, we were not surprised at how
the scores varied ever so slightly. Taking the
video load off the motherboard and allowing it to be
handled by a separate PCI video card yielded no
measurable gains in processor potential.
Fortunately, this all changed with the remaining two
tests.
MEM @
1.2GHz. w/AGP MEM @
1.2GHz. w/PCI
HARD DRIVE
w/AGP
HARD DRIVE w/PCI
With a
system that has so many feature integrated onto the
motherboard, the memory bandwidth is the area that would be most
affected by disabling components. Since all
components are reliant on the memory system, and the
onboard video reserves 32MB of system memory
for video functions, we expected to see some gains by
adding the Xtasy MX420 from Visontek. The first
test that showed improvement was memory performance.
With the upgraded graphics, the SS40G saw a nice
little increase in the Integer test and also posted
nominal gains in the Floating point test. This
also became evident when we ran tests on the hard
drive as well. With the increased amount of
memory and bandwidth available to the system, we measured a gain of
over 1300 points with the file system benchmark.
So overall, it seems that the file system had the most
to gain when adding a secondary video solution to the
SS40G.
|
|
|
More Performance With PC Mark 2002 |
|
CPU, Memory and
HD... |
|
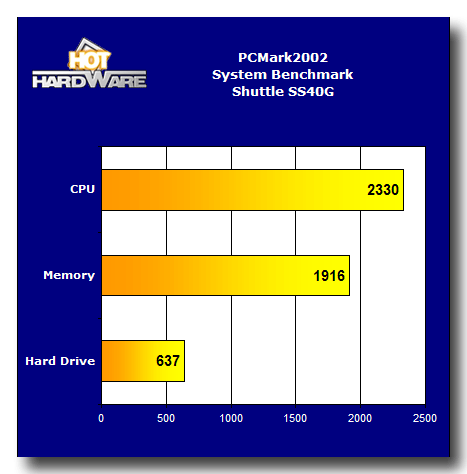
One of the
newest benchmarks around for gauging a
system's overall capability is PCMark2002. This
is MadOnion's latest creation that completes its
assessment of a system by testing the three most
important components: CPU, Memory and Hard
Drive performance. We ran this test with both
onboard AGP graphics and with the Xtasy MX420 installed and the
difference in scores was negligible. So with
this test we've opted to report the scores obtained
with the AGP graphics enabled.
Overall,
the CPU and Memory scores were what we would have
expected out of the SS40G in its current
configuration. Granted, this system isn't going
to break any speed records anytime soon, but as we've
mentioned, the SS40G wasn't designed to be a
high-performance system. What this test does
show is that the system is more than adequate to
perform a wide range of tasks.
Now we'll
throw a few gaming benchmarks at the SS40G and compare
the performance of the onboard AGP graphics to the Visiontek
Xtasy GeForce4 MX420.
More Benchmarking and The Wrap Up
|