Building Your Own DIY Surveillance System With Synology DiskStation
Connecting IP Cameras To Your Synology DiskStation
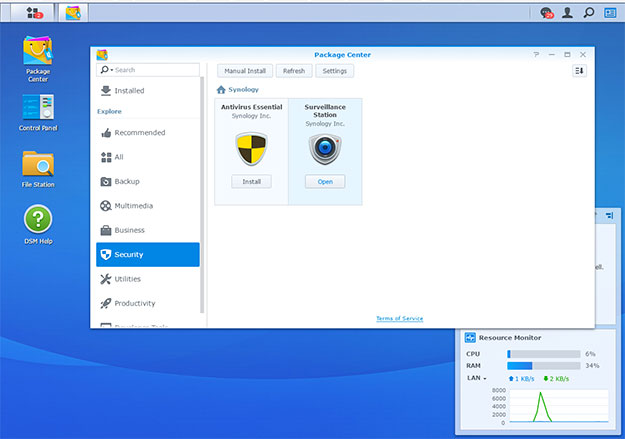
Once you have installed and connected your cameras, return to the DiskStation web interface and click on the “Package Center” icon. Search for Synology's "Surveillance Station” app or find it under the “Security tab” and click Install. The application will begin installation and then present a short setup window. When complete, click “open” in order to bring up the surveillance station in another tab.
Select “IP Camera” on the Surveillance Station desktop. You can either directly enter your camera’s connection information into the “Add Camera Wizard” page or search for your compatible camera on the network. Then click “Test Connection”. Once you have received a green check mark, select “Finish”. The camera should appear on your list in the IP Camera program.

If you want to view the camera in your browser, you will need to install the “SurveillanceHelper” add-on when prompted. NPAPI (the Netscape Plugin Application Programming Interface) is necessary to see the cameras live in the browser.
You will see an “edit” tab under the IP Camera interface. Here you can edit your device and recording settings. Under “device settings”, you can play around with camera settings which include video resolution, frame rate, and image quality. Users can also choose between TCP and UDP transport protocol. Under “optimization”, you can primarily schedule reboots. You are able to limit the amount of video that is archived and alter recording attributes under “recording settings”.
In “Live View” you can pan, tilt, and zoom (PTZ) and alter your camera settings. The PTZ features are only available if your camera supports them. If your camera has a microphone, you will be able to access the audio. You can set up multiple cameras and review your footage side-by-side as well.
You can click on “Alert” and set up notifications such as beeping or flashing if the camera detects motion or tampering. Users are also able to access their alert history and can decide how long to keep their alert history logs. You can set your camera to only record when motion is detected in the frame in order to save on storage space. Storage size will vary depending video quality settings, which include resolution and framerate which influence your bitrate (e.g. 3000Kbps). You can multiply the bitrate by length of recording time (in seconds) to estimate how much storage is needed. Ours is set to 1920x1080 at 15fps with a bitrate of 4000Kbps. It uses about 240MB per minute of footage on average.
Set “High Quality” to Stream 1 under the Stream Profile and set “Balanced” to Stream 2. Scroll down the page and set “Stream 1” and “Stream 2” to your desired image settings.
Go to the “Recording Settings” tab and choose “Profile” at the top. Ensure that “Continuous” is set to “Balanced” while “Motion Detection” is set to “High Quality”. Click on save, click out of IP Camera and select Live View.
Click on “Management” under the Alerts tab on the left side of the screen, then enable motion detection and save your changes. Your camera should now jump into a high resolution if it detects motion while otherwise saving you precious disk space.
If you return to the Surveillance System interface, you can also access a Timeline where you can view your camera’s footage. You will be able to easily scrub forward, go backward, or pause the footage as you review it. You can fast-forward up to 8X during footage review. The DiskStation automatically overwrites the oldest footage once you have maxed out your storage. And good news, you will finally be able to figure out what made that loud bang outside at 4 in the morning.
Synology incorporates a "Smart Search" feature as well. Users can configure the tool to detect missing objects, foreign objects, lost focus, etc. You can also select areas of the screen so that the system knows where to focus its attention in each frame and then click the play button to begin scanning. A small clip will be saved on the right hand side of screen every time something the user has selected (e.g. motion) has been detected.
There is also a mobile app called "DS Cam". The app allows users to view their live footage from a mobile device like a smartphone or tablet, control the camera, and select previously recorded camera footage to examine. Unfortunately, the mobile app is quite basic and lacks many of the functions that the main DiskStation software includes.
Select “IP Camera” on the Surveillance Station desktop. You can either directly enter your camera’s connection information into the “Add Camera Wizard” page or search for your compatible camera on the network. Then click “Test Connection”. Once you have received a green check mark, select “Finish”. The camera should appear on your list in the IP Camera program.

If you want to view the camera in your browser, you will need to install the “SurveillanceHelper” add-on when prompted. NPAPI (the Netscape Plugin Application Programming Interface) is necessary to see the cameras live in the browser.

You will see an “edit” tab under the IP Camera interface. Here you can edit your device and recording settings. Under “device settings”, you can play around with camera settings which include video resolution, frame rate, and image quality. Users can also choose between TCP and UDP transport protocol. Under “optimization”, you can primarily schedule reboots. You are able to limit the amount of video that is archived and alter recording attributes under “recording settings”.

In “Live View” you can pan, tilt, and zoom (PTZ) and alter your camera settings. The PTZ features are only available if your camera supports them. If your camera has a microphone, you will be able to access the audio. You can set up multiple cameras and review your footage side-by-side as well.

You can click on “Alert” and set up notifications such as beeping or flashing if the camera detects motion or tampering. Users are also able to access their alert history and can decide how long to keep their alert history logs. You can set your camera to only record when motion is detected in the frame in order to save on storage space. Storage size will vary depending video quality settings, which include resolution and framerate which influence your bitrate (e.g. 3000Kbps). You can multiply the bitrate by length of recording time (in seconds) to estimate how much storage is needed. Ours is set to 1920x1080 at 15fps with a bitrate of 4000Kbps. It uses about 240MB per minute of footage on average.
Advanced Configuration
The DiskStation offers numerous customization options. For example, you may want to continuously record footage, but are afraid of eating up all of your storage space. You can configure your recordings to record at a high quality when something occurs on your screen, but a low quality when all is quiet. To do this, click on “IP Camera” and select a camera or group of cameras. At the top of the interface, choose “Edit” and go to the “Video” tab under “Device Settings”.
Set “High Quality” to Stream 1 under the Stream Profile and set “Balanced” to Stream 2. Scroll down the page and set “Stream 1” and “Stream 2” to your desired image settings.
Go to the “Recording Settings” tab and choose “Profile” at the top. Ensure that “Continuous” is set to “Balanced” while “Motion Detection” is set to “High Quality”. Click on save, click out of IP Camera and select Live View.

Click on “Management” under the Alerts tab on the left side of the screen, then enable motion detection and save your changes. Your camera should now jump into a high resolution if it detects motion while otherwise saving you precious disk space.
If you return to the Surveillance System interface, you can also access a Timeline where you can view your camera’s footage. You will be able to easily scrub forward, go backward, or pause the footage as you review it. You can fast-forward up to 8X during footage review. The DiskStation automatically overwrites the oldest footage once you have maxed out your storage. And good news, you will finally be able to figure out what made that loud bang outside at 4 in the morning.
Synology incorporates a "Smart Search" feature as well. Users can configure the tool to detect missing objects, foreign objects, lost focus, etc. You can also select areas of the screen so that the system knows where to focus its attention in each frame and then click the play button to begin scanning. A small clip will be saved on the right hand side of screen every time something the user has selected (e.g. motion) has been detected.

There is also a mobile app called "DS Cam". The app allows users to view their live footage from a mobile device like a smartphone or tablet, control the camera, and select previously recorded camera footage to examine. Unfortunately, the mobile app is quite basic and lacks many of the functions that the main DiskStation software includes.


