Thermaltake Level 10 Gaming Station Review
Installation

|
|
|
|
Hardware Used: Cooler Master Hyper 212 Plus Heatsink |
Antec TruePower Quattro TPQ-1000W Power Supply Crucial M225 128GB SSD Seagate Barracuda 2TB Hard Drive Western Digital VelociRaptor 300GB Hard Drive Sony DVD Burner |
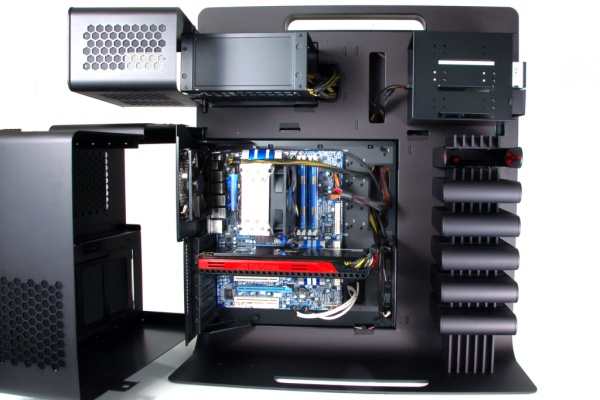
In order to get a feel for the installation process, we decided to use some of the latest components we could get our hands on. We assume that Level 10 owners would likely install high end parts, so that led us to choose Gigabyte's P55A-UD7 motherboard, a Core i7 870 processor, 4GB of Kingston HyperX DDR3-1600 memory, and an XFX HD 5970 graphics card. One of the questions we had going into this showcase was about graphics card compatibility, so naturally we were anxious to find out if the foot long HD 5970 would fit in the provided space. In addition, we chose Cooler Master's Hyper 212 Plus cooler, Antec's TPQ-1000W power supply, a 2TB Seagate hard drive, and a Sony DVD optical drive. The Hyper 212 Plus is one of the taller CPU coolers we had available and we were curious about height clearance issues with it during installation.
As with any computer case, a removable motherboard tray is a luxury for installation purposes that we enjoyed having. The area provided by the Level 10's mobo tray was sufficient for our parts as both the CPU cooler and videocard went in without incident. Initially, we thought the 140mm fan would have to be removed in order to house the 12" graphics card but fortunately that was not the case. The 6.2" tall CPU cooler also installed without any problems so unless you plan on using an extremely large HSF, its' safe to say that the Level 10 will accommodate it.
Installing the power supply was simple enough. Swinging open the PSU cover, we then removed two small screws holding the power supply cage in place and lifted it off the enclosure. Like the motherboard tray, the power supply cage allowed us to install the PSU separate from the main enclosure. Once inside the cage, we secured the assembly with the two screws that were removed earlier and ran the cabling through the available opening. Although this particular installation step went smoothly, were were a little surprised at the diminutive size of the screws that secured the cage to the main chassis. But we admit, the PSU cage felt stable once installed so we have to trust Thermaltake did its homework on this issue.
To access the 5.25" drive bays, the cover must be opened and removed from the case. Optical drives, fan controllers, and card readers can then be installed using screws included in the bundle. We installed a standard Sony DVD burner in one of the drive bays with ease. As large as the case is, its peculiar that it limits users to only a maximum of three slots. But considering the layout of the Level 10, it seems that Thermaltake decided to provide more hard drive / SSD options than 5.25" bays.
We installed several drives in the Level 10 to test compatibility. Two 3.5" hard drives and one 2.5" SSD were chosen to see if there would be any installation issues. Both the Seagate 2TB hard drive and Crucial 128GB solid state drive worked perfectly but the Western Digital Velociraptor would not line up with the SATA power and data connector located inside the drive bay. To use a Velociraptor, you must install it in a drive bay without one of the hot swap SATA connectors. This is a limitation of the WD drive's SATA connector placement, relative to its 2.5" format that resides in a 5.25" frame, rather than a limitation of the Level 10 case.


