Arctic Accelero Xtreme IV GPU Cooler Review: Chilling A GTX 1080 Ti Founders Edition
Arctic Accelero Xtreme IV: Installation
Installing the Accelero Xtreme IV can take anywhere from 30 minutes to an hour or more, depending on your skill level and experience with this sort of thing. As with the disassembly process, take your time. Also pay close attention to the diagrams in the included instructions. Arctic Cooling did a good job with that part, though the accompanying text is lacking and can lead to confusion at some parts along the way. Fortunately for you, I already made a few and will show you how to avoid them.
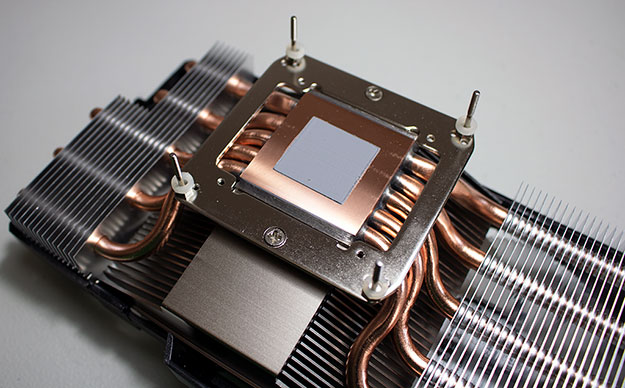
The Accelero Xtreme IV comes pre-applied with thermal grease, so that is one less step to worry about. You could always remove it and use your own thermal paste of choice, but I saw good temps from the pre-applied goo.
Each corner of the mounting plate has three tiny holes. You will have to refer to the manual (PDF) that is included for which ones to use, based on your specific graphics card. For the GeForce GTX 1080 Ti that I am installing this on, the correct holes are the ones that sit closest to the edge in each corner.
The manual will also tell you which washers to use, 1mm or 1.5mm (or both in some cases). For this card, installation calls for the 1mm washers.
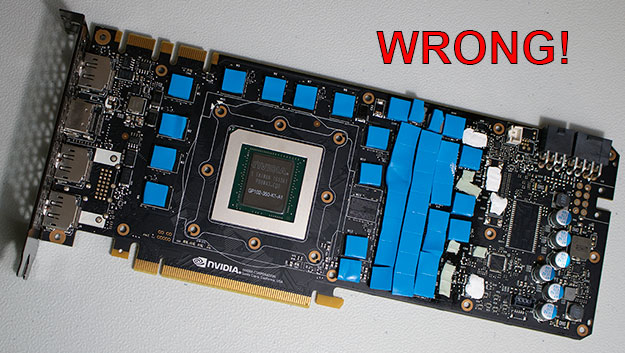
Arctic bundles in several strips of blue thermal pads that it says to apply to hot areas of the cards, so I promptly installed them everywhere NVIDIA already had pads of its own, swapping them out of course. There were a few leftover spots, so I recycled some of NVIDIA's thermal pads to cover those areas. Looks pretty good right? I thought so too, but I was wrong.
This is where not rushing through things pays dividends. The included pads are not for the front of the card, but the back. Oops!
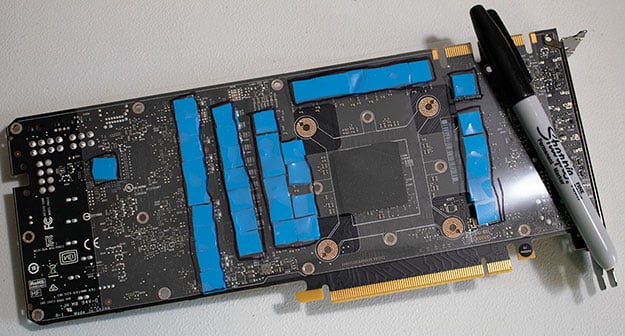
Luckily the pads peel off rather easy, so I was able to remove and reapply them to the backside of the card. There is also a foam pad that needs to go over the GPU section for spacing.
This is an area I would like to see Arctic improve upon in the next iteration, if there is one. Tasking users with identifying the "hot areas" makes this particular step more difficult than it needs to be, especially for less savvy builders. The only reference points in the manual are for a GeForce GTX 780 and Radeon HD 6970. It would be better if Arctic designed the backplate in a way that negates having to use any pads at all, though that will likely be incredibly difficult to maintain compatibility with a wide range of cards.
After dealing with the thermal pads, you have to place the included protection film over the back of the card, then mark the sections where the pads are installed with a Sharpie and carve cut them out with a razor box cutter. It feels like a low rent solution.
Protip: There is a film on both sides of the thermal pads. Leave the film on the back of the thermal pads before drawing and installing the separate protective film. Otherwise, the pads will stick to it and peel off when you remove it for cutting. I discovered this the hard way.
The remaining steps are straightforward. One piece of advice though -- plug the fan cable into your graphics card before mounting the backplate, as it can be a little difficult to reach otherwise. Once it is installed, there are six clips to attach, three on each side. The ones with screws on the side (as shown above) go on the top section, as you will need them to attach the L-shaped graphics card holder (basically a bracket). You can install your card into your case without it, but the bracket provides additional support.
Here it is, the Accelero Xtreme IV fully installed. It's a thick cooler that takes up a whopping four expansion slots with the backplate installed, so you will need to have plenty of room in your case to accommodate it. Take that into consideration if you use any other add-in PCI Express devices, like a soundcard or NIC.
The design looks a bit dated, and if you are into RGB lighting (or regular LED lighting), you will not find that here. Instead, Arctic sticks a few branded stickers on the cooler—one on each of the fans, and another along the top.
If you can forgive the looks, though, you will be rewarded with fantastic cooling performance. Let's have a look...


