ASUS PQ321 Ultra HD 4K 31.5-inch Monitor Review
Setup & Configuration
Most monitors are easy to setup. You plug in the power cord, attach the panel to your system via HDMI, DVI, VGA, or DisplayPort, and off you go. That's sort of the case with the PQ321 as well, though at this early stage, it takes a bit of finagling to run the monitor at 60Hz instead of 30Hz.
Trust us when we say you don't want to dink around Windows at 30Hz. There's too much input lag, resulting in a jittery mouse on the desktop, and things are even worse if you intend on gaming. It's a whole new world at 60Hz, and it's made possible here through a combination of video card drivers, monitor settings, and the right connection.
The steps are slightly different depending on which graphics card you own, and the one we'll walk you through is for an AMD 7000 Series GPU (if you own an NVIDIA or Intel Haswell CPU with integrated graphics, you can skip to the embedded video below for detailed instructions).

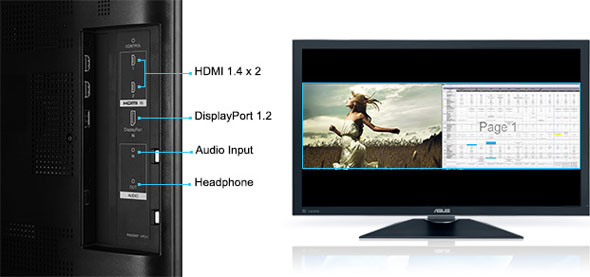
To run the PQ321 at its native 3840x2160 resolution at 60Hz, you can either use a single DisplayPort 1.2 cable or multiple HDMI cables (all HDMI cables should be connected to a single GPU). ASUS recommends the former and that's how we conducted our testing. In our case, our XFX Radeon HD 7970 Black Edition graphics card has a mini DisplayPort connector, so even though ASUS includes a DisplayPort cable, we had to pick up an adapter.
If you haven't already, be sure to update your AMD Catalyst software to the latest available. When you connect the PQ321 to your system, it's going to default to 30Hz. The first step to changing that is to open up the On Screen Display (OSD) controls and select Setup > DisplayPort STREAM. Change this from SST (single stream transport) to MST (multi-stream transport), save the settings, and hang tight a moment while the monitor reboots.
The screen may look a little funky after the monitor comes back on with multiple taskbar icons and other oddities. That's okay. Proceed to the next step, which is to open the Catalyst Control Panel, expand the AMD Eyefinity Multi-Display option from the left-hand column, and select Create Eyefinity Display Group.
You should see two square boxes labeled 1 and 2. Click on 1 and press Continue. You now need to select a layout for the display group. Select the 2x1 configuration from the pull-down menu and you're golden with a 3840x2160 resolution at 60Hz.
For detailed instructions on how to configure the monitor on all three platforms (AMD, NVIDIA, and Intel's Haswell), ASUS put together a handy video, which we've embedded below:
Trust us when we say you don't want to dink around Windows at 30Hz. There's too much input lag, resulting in a jittery mouse on the desktop, and things are even worse if you intend on gaming. It's a whole new world at 60Hz, and it's made possible here through a combination of video card drivers, monitor settings, and the right connection.
The steps are slightly different depending on which graphics card you own, and the one we'll walk you through is for an AMD 7000 Series GPU (if you own an NVIDIA or Intel Haswell CPU with integrated graphics, you can skip to the embedded video below for detailed instructions).
;)
To run the PQ321 at its native 3840x2160 resolution at 60Hz, you can either use a single DisplayPort 1.2 cable or multiple HDMI cables (all HDMI cables should be connected to a single GPU). ASUS recommends the former and that's how we conducted our testing. In our case, our XFX Radeon HD 7970 Black Edition graphics card has a mini DisplayPort connector, so even though ASUS includes a DisplayPort cable, we had to pick up an adapter.
;)
If you haven't already, be sure to update your AMD Catalyst software to the latest available. When you connect the PQ321 to your system, it's going to default to 30Hz. The first step to changing that is to open up the On Screen Display (OSD) controls and select Setup > DisplayPort STREAM. Change this from SST (single stream transport) to MST (multi-stream transport), save the settings, and hang tight a moment while the monitor reboots.
;)
The screen may look a little funky after the monitor comes back on with multiple taskbar icons and other oddities. That's okay. Proceed to the next step, which is to open the Catalyst Control Panel, expand the AMD Eyefinity Multi-Display option from the left-hand column, and select Create Eyefinity Display Group.
You should see two square boxes labeled 1 and 2. Click on 1 and press Continue. You now need to select a layout for the display group. Select the 2x1 configuration from the pull-down menu and you're golden with a 3840x2160 resolution at 60Hz.
;)
;)
For detailed instructions on how to configure the monitor on all three platforms (AMD, NVIDIA, and Intel's Haswell), ASUS put together a handy video, which we've embedded below:
If this all seems a bit complicated, don't fret, it's really a quick process when you have the monitor in front of you. However, it is a bit annoying to jump through these hoops, though ASUS tells us they won't always be there.
"A multi-stream 4K Display VESA standard is now being finalized, which ASUS will implement in a firmware update of our monitor via USB. This will enable a superior experience on this monitor similar to what users see on existing lower resolution displays without any additional configuration," ASUS says.
What that means is that once there's a standard in place and the monitor's been updated, drivers will recognize when a 4K display has MST enabled and auto-configure itself. It will be just like hooking up any other monitor.


