DJI Mavic 2 Zoom Review: An Eagle-Eyed Aerial Ace
DJI Mavic 2 Zoom: Build Quality And The DJI Go 4 App
The Mavic 2 Zoom is a quadcopter design, with four arms that fold in on one another, forming a sleek, compact, and easy-to-transport unit. Unfolded, the wingspan is 14 inches, measured diagonally, and 22 inches from propeller tip to propeller tip. The camera and gimbal live at the front of the aircraft, protected in transit by a clear plastic cover that you remove before flying. The protector is a little flimsy and finicky about reattaching, so be careful with it.
The Mavic 2 is solid. Sturdy and well-built, it feels like a brick. You wouldn't want to toss it around haphazardly just to prove a point, but odds are that it could take a decent level of abuse. The folding arms lock solidly into place when folded in or out, and except for the prop tips themselves, nothing protrudes that might catch on something and get broken off, not even the camera and gimbal assembly. Honestly, the Mavic 2 is so solid that it would take some real effort or utter carelessness to break anything, save perhaps for the gimbal that should have its cover in place for transport.

When transporting, be sure to clip on the clear plastic gimbal/camera protector.

As mentioned, one thing that has improved with this latest DJI release is obstacle-sensing and avoidance. The Mavic 2 boasts 10 environmental sensors that give it the ability to sense and avoid obstacles in front of, behind, above, below, and to either side of the aircraft.
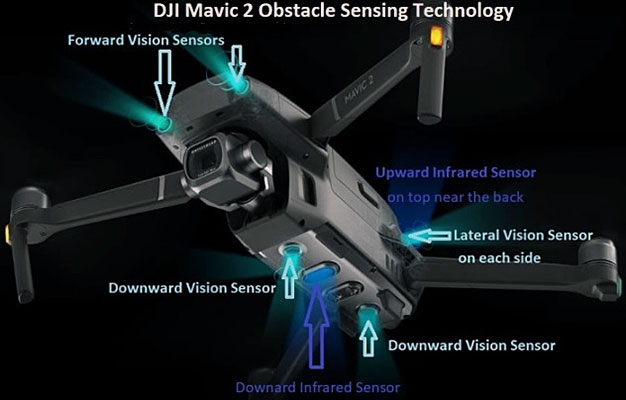
Other than greatly improved obstacle avoidance and a minor tweak in speed and max flight time, the Mavic 2 is not all that different than the earlier Mavic line, and that's a good thing. DJI was already at the head of the pack, and the minor changes they've made to the drone itself are subtle improvements; in the meantime, all of the features that drone aficionados have come to love are still present in the new line. If it ain't broke... you know the rest. The major improvements here are in the drone's sensor configuration, the controller, the zoom lens (on the Mavic 2 Zoom; not available on the Mavic 2 Pro), and in the software used to set up and fly the aircraft, all of which we'll discuss shortly.
The DJI Mavic 2 Zoom Controller
The controller is sturdy, ergonomic, and easy to use, with a bright mono display front and center. It includes detachable controller sticks (which store in the controller itself) and a number of connectors that allow the user to connect just about any iOS or Android mobile device to the controller. Unfortunately, the controller doesn't handle larger devices, such as the iPad Mini, very well. However, there are plenty of third-party options that will allow you to use your tablet with the device. These start at $15 to $20, so we're not talking about a major investment.
Note that one short press on the controller's power button will display the remaining battery power. To actually start the controller, use one short and then one long press. (Don’t ask me how long it took me to figure this out.)

However, attaching a tablet may require a third-party add-on.
The controller accepts input from—and sends output through—a variety of connectors, including Lightning, Micro USB (Type-B), and USB-C, so just about any mobile device that can fit into the controller's grips can connect to the controller. You'll get about 130 minutes of battery life from the controller before needing to recharge, but that could be reduced somewhat if your phone battery is low, because the controller will actually divert some of its battery power into charging your phone. Note that physically connecting your mobile device to the controller can be maddeningly tricky, because you have to A) select the correct connector and cable—though only once, unless you're changing mobile devices, B) position the (sliding) end of the connector to the correct place in its channel, and then C) get your phone lined up exactly right in order to plug the male end of the controller's connector into your phone's female USB-C, Lightning, or whatever connector. It's a pain the first couple of times, at least when using an Android device, but after a little practice, you'll get the hang of it.
There are three main controller modes, controlled by a small slide-switch on the right side of the controller: S for Sport mode, in which the aircraft can reach its maximum speed and in which it is most responsive to stick inputs. Note: no onboard vision systems are enabled in S Mode. There's also T or Tripod mode, which features very limited flight, ascent, and descent speeds—this makes the craft very stable, which improves videography, and P or Positioning mode, in which all location systems are active and in which the intelligent flight modes, semi-automated flight and imaging modes such as Quickshots, Active Track, and Hyperlaps, are enabled. The default mode is P, and you may find that you rarely use the other modes.

One final note about the controller: At the top-left is a thumbwheel that controls the camera's tilt; scroll it to move the camera up and down. You can also instantly toggle the camera all the way up or all the way down by using the programmable C1 button on the back of the controller toward the top. At the top-right of the controller is another thumbwheel; this one controls the camera's zoom level.
The DJI Go 4 App
The DJI Go 4 app works in conjunction with the controller to provide a fairly intuitive and very informative (but somewhat busy) interface into the aircraft and its current condition, position, and flight parameters.
In my opinion, the most important option on the controller or the app screen is the RTH (Return to Home) button/icon. Every drone pilot's greatest fear is having to watch your drone as it sails out of sight over an endless field or forest or (worse yet) lake or sea. Luckily, the Mavic 2 provides an RTH button. (Two of them, actually; an icon on the display screen of the app, and a physical button on the controller itself. The controller also includes a red Pause button that could turn out to be equally helpful if things begin to go south.) The RTH feature works in three ways: The user can trigger it manually, in which case when the button is pushed, the drone stops whatever it's doing, ascends to a predetermined altitude, and returns to its point of origin. Alternatively, if the battery begins to run low and the pilot does not respond by landing the drone before the battery reaches a preset (and adjustable) threshhold, the software will return the drone to its point of origin. Finally, "Failsafe" RTH will be triggered automatically if the drone loses radio contact with the controller for two seconds. The Pause button is worth its weight in gold. Whenever things get dicey and you're not sure the drone is reacting as you had expected, push the Pause button; now you have time to calmly think about your situation, assess your drone's position, check out your surroundings, etc. Worst case, you can now push the RTH button.
Note that in all cases, RTH depends upon having an accurate and strong GPS signal and correctly calibrated onboard compass. If those are off when you launch, the aircraft may not be able to find its way home. So, pay attention to that onscreen message telling you that it's time to (re)calibrate; it only takes a few seconds, it's not at all complicated, and it could save you $1,200.
When you launch the DJI Go 4 app, the first thing you'll see (after a splash screen) is the Enter Device screen; tap that to connect to the aircraft. This will take you to a series of screens explaining how to unfold the drone's arms, install the battery, etc. Most people will have already done this, and by now will be frantically clicking their way through so they can get to the point where they can fly their drone. The app will then tell you to start the drone (use one short and then one long press on the button on top of the battery), connect the cable to the controller (easier said than done, at times) and insert the device into the controller grips, unfold the antennas, and then link the controller/app combo to the drone.
Once you're connected, you'll see a green GPS indicator at the top left of the app screen. If it's red or yellow, then something's not right; either you don't have a good GPS signal or the compass needs to be calibrated. A word of warning: Do NOT fly until you correct whatever the issue is. You will regret it. (Please do not ask me how I know this.) You can click the green (or red) bar to see a fairly comprehensive listing of the drone's status: radio channel quality, compass status, flight mode, SD card capacity, etc. If any of the items are listed in red, something needs your attention.
To the right of the status bar you'll see a drone icon; click that to access your controller settings, many of which are customizable. These include the RTH altitude (you want the drone to clear any trees or buildings that might be in its way as it attempts to return), Home Point settings (is the home point your launch site or the location of the controller?), and a Beginner Mode switch. If you're new to flying a drone, stay in Beginner Mode for a little while; it limits your speed and also the distance from the controller that the drone will fly. Think of it as aerobatic training wheels. The list also includes programmable distance and altitude limits. Legally, of course, you're supposed to stay within line of sight and under 400 feet. Follow the rules; don't be a Bad Person.

A note about setting your RTH point. At first it doesn't seem to make much sense to have the controller's location as your RTH point; after all, you're holding it in your hands, right? But what if you're in a boat or car? You (and the controller) will almost certainly have moved since you launched; you really don't want the drone to land in a patch of water where your boat used to be.
Further to the right along the top, you'll see an icon telling you how many GPS satellites are locked on to the drone (more is better, go figure). Moving to the right some more, you'll see what looks like a Wi-Fi icon; this details your visual navigation settings. These settings allow you to fine-tune your drone's obstacle-avoidance and display a real-time radar map, and this is where you turn on various types of obstacle avoidance. Most people just leave these turned on all the time.
The next icon you'll see is for the remote Controller settings. Here you'll be able to calibrate the controller and customize the two small buttons on the back-left and back-right of the controller, as well as the multi-position button on the right side of the front of the controller.
Next to the Remote Controller icon is the HD icon, which lets you set transmission modes and rates. These control the live camera feed sent to the controller, and in most cases there's no need to mess with this.

At the far right of the app screen is the three-dot General Settings ellipses icon. Click here to set your measurement units to metric or imperial, choose a live-streaming platform (Facebook, YouTube, etc.), set the video cache, and name your drone. Here you can also modify gimbal settings; some people like to slow down the gimbal movements in order to get smoother video.
At the far left of your mobile device's display, beneath the DJI logo, you'll see the auto-launch icon. Tap it (and then move a slider to confirm), and the drone will take off and hover at about 4 feet. You can also take off manually by bringing both joysticks down and in toward the center of the controller. Once launched, the auto-launch button will change to an auto-land button; clicking that (and confirming the action) will automatically land your aircraft, bringing it straight down from its current position. Below that is the onscreen RTH icon, which functions the same as the hardware RTH button: when you push it, the drone will rise to its predetermined (and programmable) RTH altitude, and then return home and land.
Below that is an icon that looks like a remote controller, with little antennas sticking up. Somewhat confusingly, that actually takes you to a collection of Intelligent Flight modes. These include TapFly (select a target, and the drone flies toward or away from the target), Cinematic Mode (turning speeds are reduced and braking distances extended as a way to acquire smoother video), HyperLapse (the aircraft creates a smoothly transitioned time-lapse video based on parameters you select in the various sub-mode menus), and ActiveTrack (select an object—a person, a car, a boat, etc.—and the aircraft will follow it, either tracking from above or parallel to the subject. Finally, in ActiveTrack's Spotlight sub-mode, it does not actually follow the subject, but it keeps the camera focused on that subject while you fly the drone.

But wait, there's more! Yes, there are still more shooting modes to come, and they're pretty slick, because they basically automate the acquisition of types of video that many pilots have been shooting manually for some time. QuickShots shooting modes include Dronie (the aircraft flies backward as it ascends, with the camera locked on the subject), Circle (the drone flies around a selected subject), Helix (the aircraft ascends and spirals around a subject), Rocket (the drone ascends with camera pointing down), Boomerang (the aircraft flies an oval path around the subject, ascending as it flies away and then descending as it returns), Asteroid (produces a panorama shot created when the drone flies backward as it ascends, taking several photos), and Dolly Zoom.
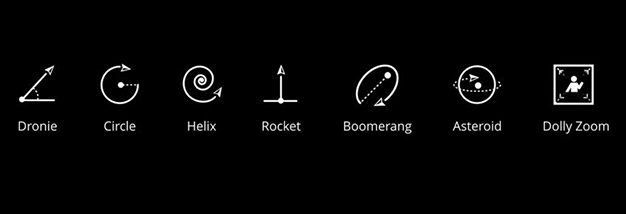
DJI Mavic 2 QuickShot Modes
That last QuickShot deserves special mention. You know that Hitchcockian technique in which a subject (usually a person) is centered onscreen and in which the subject stays in focus and at the same size in the frame, while the background whooshes toward the rear? That's a dolly shot, and your Mavic 2 Zoom (but not the Mavic 2 Pro, since it has no zoom) can create this shot automagically. It's kinda cool. Basically, the drone flies backwards but zooms in at the same time. Keep in mind that you can select the distance between the aircraft and your subject, and you need to make sure that there's plenty of room behind your aircraft so there's room to . . . well, whoosh. Here's a tutorial from DJI that covers it well...
Moving along - at the bottom left of the camera view screen is a small map; click it to toggle to a full-screen map showing the location of your drone. In some modes, you can also set a POI on the map, as a point to fly to. Your camera view will now display at the bottom left; tap it again to show a full-screen camera view.
At the right side of the screen is a slide showing the gimbal position, while at the far right are video/photo control and camera setting icons.
It's a lot of stuff to keep in mind. And this isn't a complete listing of every function; that's why DJI includes a 79-page manual, a very nice online version of which you can find here. There's an awful lot going on onscreen, and in the meantime, you're trying to pilot a $1,200 aircraft and keep it from crashing into trees, birds, water, buildings, dogs, small children, etc. This is another reason to use Beginner Mode until you're comfortable. However, if completely you're new to this, the Pause and RTH buttons will be your best friends.


