WD My Passport Wireless Review: Shared Wireless Storage
Software and Setup
When we first took the WD My Passport Wireless out of the box we were pleased to find it already somewhat charged - a handy feature WD highlights on its product page for the drive. We had to enable the Wi-Fi radio by pressing the power button for a second, and making sure the USB cable was not plugged into a computer. One of the more bizarre "features" of this drive is you can connect it to a PC via USB, or wirelessly, but not both at once. It broadcasts with an SSID named MyPassport by default, so once we connected to the network we just typed "http://mypassport.local" into a web browser and were brought to the admin screen shown below.
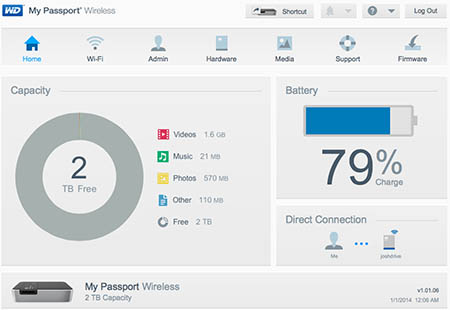
The admin software is easy-to-read and very useful. The home screen displays all the relevant info including the amount of free space on the drive as well as the number and type of files taking up space.
The Wi-Fi tab on the admin screen shows how the device is connected currently, and also lets you connect the drive to a Wi-Fi network so that others can share it.

Clicking over to the Admin tab, this area lets you change login details for the drive, change the device name, and configure SSH and FTP access. You can also restore the drive to factory settings here if things go sideways.
The Hardware tab deals with the devices physical characteristics, and shows you the battery's current state and whether its charging or discharging. You can switch the battery's default mode between either performance or energy saving, but we left it on Performance throughout testing. The Drive Lock lets you basically turn the USB port off, so if someone connects it to their computer it won't be accessible. Its contents can still be accessed wirelessly, however, if the person connecting has the correct credentials.
The Media tab lets you enable or disable DLNA streaming, rebuild the media library, and change the behavior of the SD card port. You can select whether or not the default behavior is to copy or move the contents of the card to the drive when a card is inserted, which is a great choice to have.

The Wi-Fi tab on the admin screen shows how the device is connected currently, and also lets you connect the drive to a Wi-Fi network so that others can share it.


The Hardware tab deals with the devices physical characteristics, and shows you the battery's current state and whether its charging or discharging. You can switch the battery's default mode between either performance or energy saving, but we left it on Performance throughout testing. The Drive Lock lets you basically turn the USB port off, so if someone connects it to their computer it won't be accessible. Its contents can still be accessed wirelessly, however, if the person connecting has the correct credentials.

The Media tab lets you enable or disable DLNA streaming, rebuild the media library, and change the behavior of the SD card port. You can select whether or not the default behavior is to copy or move the contents of the card to the drive when a card is inserted, which is a great choice to have.

The Support tab lets you send a diagnostic report to WD, thereby requesting remote support for your drive. You can also download a drive report in case a support agent asks you to do so. It could not get simpler than this, so we appreciate WD's attention to making things easy. You can also run tests on the drive, and choose whether or not to participate in the product improvement program.


The Firmware tab is just as easy to use as the Support tab, in that
it clearly lays out what version of Firmware you are running, and when
it was updated. It is also simple to check for updates, and
theoretically easy to run the tests.


